Children's Book Sketch: Critique Needed!
-
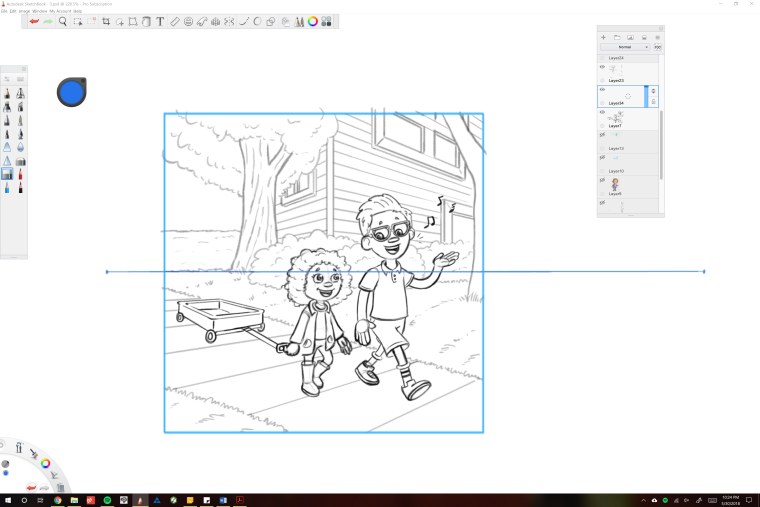
Working on a children's book and really trying to push the use of perspective but also struggling to keep the rules. I thought I was doing this drawing correctly but then felt that if you were to scale the kids to the house, the house would be insanely large compared to the characters. Not sure if at this point I'm overthinking it. Any drawovers and explanations would be highly appreciated! This forum has been a godsend in the past couple years for me!!
-
I don’t think the house is too big compared to the kids - if that is the door on the right side I think it´s pretty accurate (the windows are way too big compared to the door, though).
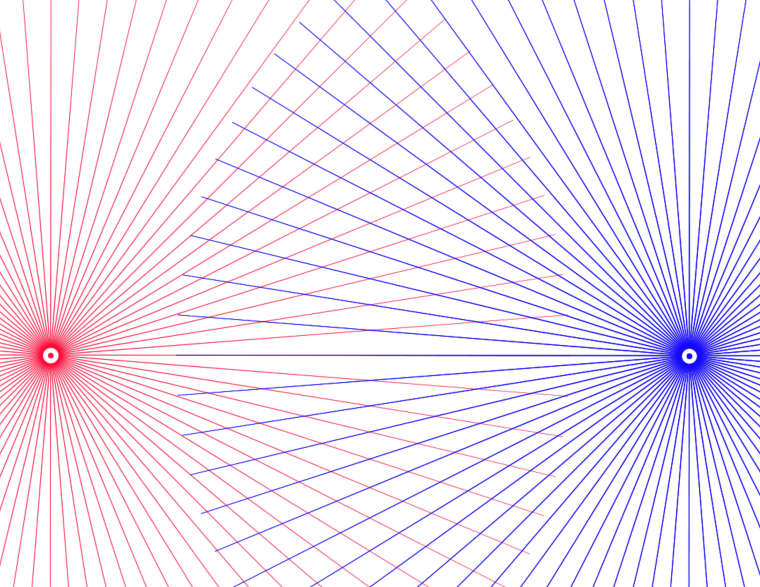
There is an issue here that I see very often when people practice 2-point perspective: your vanishing points are too close. The general rule is that you cannot put vanishing points on the page with two points perspective (nor with three points). There are exceptions, but in general, your vanishing points should be further out to the right and left of the image if you want to avoid deformations. With digital tools, this is easy to manage. When I worked traditionally, I used to have a really large piece of cardboard to tape my paper on, so that I could set the vanishing points on the board to draw a perspective grid.
Another issue here is that the path is not in perspective. It doesn’t have the same vanishing point as the house, which is fine (it can be at an angle to it rather than parallel), but also it doesn’t actually have a left vanishing point (the sides are parallel), while it has a right vanishing point.
When you have objects that are not parallel, each has its own set of vanishing points, but the relationship between the „sets of vanishing points“ follows rules. It´s easier to keep everything parallel at the beginning, even thoug it looks stiff.
Here is a super trick for you. Take a photo that has the same perspective/viewpoint you want and create (trace) its perspective grid. You just need to look for two parallel „lines“ that are converging somewhere (roofline and line of the windows, for example) and trace them until you find the first vanishing point (and the horizon). Once you have the horizon, you only need one „line“ to find the other vanishing point. Once you have your horizon and vanishing points, delete the photo and just „fan out“ some random lines from both vanishing points: that´s your grid. You can use that to build your image and it will have correct „real-life“ perspective.
-
Thanks for you reply! I appreciate it. I guess the reason I was getting super tripped up about scale is that I know you can take a character and scale them in space based on where their body hits the horizon line. That just doesn’t seem to work for this setup, and I’m really confused as to why. https://i.pinimg.com/originals/c6/e0/52/c6e052922fdb141871451343cfd60dd4.jpg
-
@andrewgthomas there’s a lot of tricks to do that too. I actually had a whole course just on that at school. I’m thinking maybe I should do a few videos around perspective tricks, but I have the feeling I get too tripped up with details. I’m not a good explainer....
-
@smceccarelli I have to disagree. I think you are a very good explainer and you are one of the people on the forum whose comments I always read carefully. Keep making those videos!
-
@smceccarelli, I agree with @demotlj!
Your comments are always very helpful, Simona! I know it's going to be something good when I see your little red icon! -
With regards to the perspective part of this post I use a spoke brush to setup my grid by stamping each spoke onto two separate layers I can move them around with the move tool to get the correct field of view. This method was something I learned in another course and it is a very fast way to get started.
-
@rcartwright What is a spoke brush? Are you able to change the angle of the lines?
-
@miriam It is a brush with spokes like a bike wheel, you don't change the angle you just move it in and out around the picture until it lines up with your sketch by using the move tool and scaling up and down. I start by making a frame the shape of my picture plain and then I can place my points outside that frame. I you want the brush I can email it to you but it is easy to make